a glob of nerdishness

February 9, 2012

CHDK-like intervalometer on a Canon 350D (Rebel XT) from Mac OS X

written by natevw @ 10:46 pm

An up-coming new hobby reminded me of the CHDK (Canon Hack Development Kit) project. I realized that my old Canon 350D body was ripe for some experimentation, since (due to a flaky shutter release button) I use it only as a backup to my T1i these days.

As it turns out, my Canon 350D (a.k.a. Rebel XT) digital SLR camera is not supported by CHDK. This means it’s outside of the normal CHDK ecosystem of motion detection, BASIC/Lua scripting and the like.

However, there is a way to hack the 350D to enable a smaller handful of “bonus” features and settings, including an ISO extension to ASA 3200 and an intervalometer mode useful for things like time-lapse photography. I had a few hiccups getting it going — proceed at your own risk! — especially from Mac OS X it seemed, but here’s how I did it:

  1. First, find a small (4GB or less) empty CF card and format it using the camera’s menu — this should give you the FAT16 filesystem needed for the next two steps.
  2. Grab the bootflg2.zip file attached here and copy the “bootflg2.fir” file in it onto your card, preferably via the command line. (NOTE: I had trouble when I just copied it using the Mac OS X Finder, which creates a hidden ._bootflg2.fir metadata file alongside. This extra file seems to confuse the camera in the next step, so make sure you delete this file if it appears via Terminal.)
  3. Now follow the instructions in the ReadMe.txt file included in the bootflg.zip folder for how to trigger the “hacking” of your camera’s built-in firmware so it will load the additional bootable code we’ll be dealing with in the next steps.
  4. Now download and use the MacBoot card preparation tool that fills in for the Windows-only CardTricks step. Make sure to choose the “Make DSLR-bootable” radio button, which (as explained above) is different than the normal CHDK process. You can use the same card as before or a new one(s).
  5. Once you’ve setup each CompactFlash card to enable the bootable custom firmware, you’ll need to actually put a version of on each card you’ll be taking pictures onto while the custom controls are enabled. The latest version of these files I could find was 350D-20101011.zip (via the forums). Basically, put the included “autoexec.bin” file on any cards you’ve made DSLR bootable via the previous step.

There’s some more detail and links in the instructions buried within the banner ad–splattered CHDK Wiki page for the Rebel XT, as well as the best overall summary of how to actually use the custom menu features enabled by the custom code on your CF card about halfway down the page. If you have questions, the best place to get help and find even more details is probably this forum thread.

Not quite plug-and-play but on the bright side, there’s very little fluid dynamics or tax regulations involved. Now when I plug in a compact flash card I’ve made bootable, I get even more control over my exposures than the camera already provides out of the box.

With this hack running, I can also set my camera to just keep taking pictures, say, every 10 seconds — should be great for time lapse and remote photography situations. If I want to disable all the experimental “power user” features, I just turn my camera on with a non-bootable card in the CF slot, and it goes back to its normal featureset.

March 4, 2011

Not embarrassed

written by natevw @ 11:14 pm

When you’ve been taught that shipping an embarrassing “version one” means you shipped early enough, then it’s hard to be embarrassed by such a release.

On the self-imposed deadline of February’s end, I called the progress I’ve made on ShutterStem so far and named it “version one”. By the time I got around to actually tagging the “1.0″ release in version control, the source code had already gained an additional contributor with support for an additional version of OS X. And a bit of documentation.

Two months ago I had whittled down the insurmountable task of going from version 0.1 to version The World Is O’ertaken, into a outline of requirements in an otherwise empty repository branch called “take_two”. These requirements focused on a primary metabolism of the amateur photography workflow: breathe in, pick images to share, breathe out.

It’s interesting to see how version 1.0 differs from its original requirements; projects always do and are often better for it. It’s less fun to see what suffered for the deadline. Hence the “early enough”: it sets up like a <artistic analogy regarding difficulty>, it looks like a <deprecating humor regarding homeliness>, and certain parts got shipped in a <one hundred percent half-assed state>.

But it works.

I was sitting around the house one evening, pouting about how pitiful my project was as I used it on an iPad. My wife was nearby with her laptop, helping me collect images into baskets. Organizing the same photo library, via completely different devices, over only the local network. The mainframe across the room was no longer just a big hard drive behind a big screen, but also a server — and not even the server! — as we relaxed over on the couch and enjoyed paging through photos together.

I think it’s got a shot.

November 16, 2010

Fourth generation iPod touch camera focal lengths

written by natevw @ 9:16 pm

Late one night soon after I bought my fourth generation iPod touch, I did some sloppy measurements to try figure out the 35mm equivalent focal length of each of its two cameras. Here is a sloppy summary of my findings.

View from the iPod

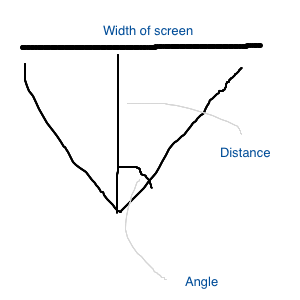
The display on my MacBook is 11 5/16 inches wide (287.3375 mm). It fills the back (”720p”) camera width at a distance of 14 3/16 inches (360.3625 mm). It fills the front (”FaceTime”) camera width at distance of 11 inches (279.4 mm).

iPod focal length setup

Using some basic trigonometry:


a = 2 arctan (d/2f) # a = angle, d = dimension (my "width"), f = focal length, or, subject distance

…we can find each camera lens’s angle of view:


2*Math.atan2(287.3375, 2*360.3625) = 0.7587331199535923 radians (43.47 degrees)
2*Math.atan2(287.3375, 2* 279.4) = 0.9498931263447237 radians (54.42 degrees)

Standard 135 film is 35mm wide, and it is on this format I wanted to figure out the iPod lens equivalent. I massaged the angle of view calculation into a form that could yield a focal length based on an angle:


tan(a/2) = d/2/f

For 35mm equivalent, I plugged in 35 for d (”dimension”, my “width”) and solved for focal length as a function of angle:


tan(a/2) = 17.5/f
f = 17.5/tan(a/2)

So, the front (”720p”) camera has a focal length equivalent to a 44.9mm lens on a 35mm film camera body (or a 27.44mm lens on an APS-C body). The back “FaceTime” camera is wider, equivalent to a 34.0mm lens on a 35mm film body (or a 21.25mm lens on an APS-C body)

Then I looked at the EXIF metadata to see what it says about the camera. For the 720p camera, the metadata records a focal length of 3.9mm. If my 35mm equivalent focal length calculations are correct, this means a crop factor of 11.26 and thus a 3.11mm sensor width.

Now for the FaceTime camera, the EXIF metadata records a focal length of 3.9mm. Again? So allegedly this would be a 8.72 crop factor and 4.02mm sensor size. However, this camera is lower resolution (640×480 versus 960×720) and I have a hard time believing that it is a larger sensor. (If it were, the per-pixel area would be significantly larger and I’d expect much better quality and low light performance than the back camera.) I suspect the focal length metadata is (or at least was when I first looked…I should check again on the latest iOS) simply wrong for pictures taken with the FaceTime camera.

September 12, 2007

A link to JPEG compression explained in some depth, but with light still reaching the bottom so as to not be too scary.

written by natevw @ 6:02 am

Via Jeff Atwood, “an excellent visual explanation of how JPEG works“. Includes both JPEG and JPEG 2000, with an emphasis on explaining the algorithms well.

September 8, 2007

Picture Lobbyists Association of America

written by natevw @ 5:42 pm

About two weeks ago, James Duncan Davidson’s comment traffic shot up after he politely complained about online photo attribution. Although he lamented about opening a “can of worms”, what I saw publicly was a civil discussion about image netiquette.

Really, photos have got it pretty good these days. We “manage rights” by the good old-fashioned techniques of asking, encouraging, trusting and forgiving. When necessary one can complain, informally or formally. I haven’t heard of any photography coalitions sobbing before Congress about the Internet-induced collapse of all that Is Right and Proper. Google Images lives on, for better or for worse, with no federal agents seizing servers. Nobody’s putting pressure on Apple to make iPhoto automatically delete “pirated” images — my wife can even drag a picture from my shared library into hers when she wants.

The biggest threat to a photographer’s livelihood is competition, not piracy. But unlike certain other industries, this is not a new phenomenon. A new market condition like crowdsourcing (further reading here, here and here) isn’t the end of the world for the photographic trade, just like the Brownie camera wasn’t the end of anything much. I’m glad to be a developing participant in a guild that reacts to change with creative solutions and resolute improvement.